Posts

SQL Joins

Image
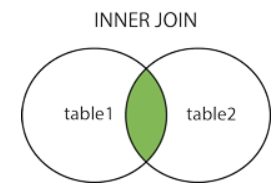
Joins are used to combine rows from two or more tables based on related columns between them. Joins allow you to retrieve data from multiple tables simultaneously, enabling you to create complex queries that fetch data from different sources. There are different types of joins in SQL, including: INNER JOIN Returns only the rows that have matching values in both tables based on the specified join condition. It discards non-matching rows from both tables. Example:           create table t1(x int); insert into t1 values(1); insert into t1 values(1); insert into t1 values(0); create table t2(y int); insert into t2 values(0); insert into t2 values(1); insert into t2 values(1);           select * from t1 inner join t2 on t1.x = t2.y Output: 2. LEFT JOIN (or) LEFT OUTER JOIN Returns all the rows from the left (or first) table and the matching rows from the right (or second) table. If there is no match, NULL values are

MLFlow Serving Custom Models in production environment

Image
  Serve Word2vec pretrained model using pyfunc flavor through docker. After completing development, if you want to serve your trained model, then it has to be either logged or saved via log_model()/save_model() function using one of the built-in flavors. MLflow does support multiple built-in flavors such as sklearn, keras etc and the flavor type is saved in the MLmodel file. Below is the example to save the model using sklearn flavor. mlflow . sklearn . log_model(sk_model, "sk_models") Flavors are the key concepts which makes MLflow more powerful. Flavors are a convention that deployment tools can use to understand the model, which makes it possible to write tools that work with models from any ML library without having to integrate each tool with each library. And the below command helps to expose the logged model as a service mlflow models serve -m ‘runs:/616e1e58d5814be58f613f13dfd8e9de/’ -h 0.0.0.0 -p 8000 And you can access the exposed model in the postman like this. htt

Airflow basic custom web view

Folder Structure Plugin |_test_plugin    |_templates       |_test.html    test_plugin.py test_plugin.py from airflow.plugins_manager import AirflowPlugin from flask import Blueprint from flask_admin import BaseView, expose from flask_admin.base import MenuLink class TestView(BaseView):     @expose('/')     def test(self):              return self.render("test.html", content="Hello galaxy!") v = TestView(category="Test Plugin", name="Test View") blue_print_ = Blueprint("test_plugin",                         __name__,                         template_folder='templates') class AirflowTestPlugin(AirflowPlugin):     name = "MenuLinks"     # operators = []     flask_blueprints = [blue_print_]     # hooks = []     # executors = []     admin_views = [v]      #appbuilder_views = [v_appbuilder_package]  

Airflow dynamic dag creation and chain sequentially

DAG1: import airflow.utils.dates import airflow.utils.helpers from airflow import DAG from airflow.operators.dagrun_operator import TriggerDagRunOperator from airflow.operators.python_operator import PythonOperator from airflow.operators.sensors import ExternalTaskSensor from airflow.models.variable import Variable from airflow.utils.state import State from datetime import datetime, timedelta import dateutil.parser dag = DAG(     dag_id="dag1",     default_args={"owner": "airflow", "start_date": airflow.utils.dates.days_ago(2)},     schedule_interval="@once",      catchup=False ) def trigger_dag_with_context(context, dag_run_obj):        dag_run_obj.payload = {'job': context['params']['job']}     return dag_run_obj l1 = [] l2 = [] i = 0 for job in ["job1", "job2"]:      trigger = TriggerDagRunOperator(         task_id= job + "_dag",         trigger

SQL Access WebApi with Basic Authentication

exec CALLWEBSERVICE 'username','password' CREATE PROCEDURE CALLWEBSERVICE(@Username NVARCHAR(50), @Password NVARCHAR(50)) AS     BEGIN     Declare @Object as Int;     DECLARE @authHeader VARCHAR(8000);        DECLARE @contentType VARCHAR(8000);     DECLARE @postData NVARCHAR(4000);     Declare @json as table(response nvarchar(max))     SET @postData = '{"method":"GetUserVehicles","userid":"1323","companyid":"0"}';        SET @contentType = 'application/json';     SET @authHeader = @Username + ':' + @Password;         SELECT         @authHeader = 'BASIC ' + CAST(N'' AS XML).value(               'xs:base64Binary(xs:hexBinary(sql:column("bin")))'             , 'VARCHAR(MAX)'         )       FROM (     SELECT         CAST(@authHeader AS VARBINARY(MAX)) AS bin      ) AS bin_sql_server_temp;     EXEC sp_OACreate 'MSXML2.XMLHTTP', @Object OUT;

Postgresql CStore Implementation

Cstore is a foreign data wrapper for postgres used for the analytic workloads . Cstore highly compress and stores the data in the columnar format. The following are the steps to install and implement cstore in the postgresql 9.6 in ubuntu. > sudo apt-get install \ git \ libpq-dev \ libprotobuf-c0-dev \ make \ postgresql-server-dev-9.6 \ protobuf-c-compiler > sudo apt-get install gcc > rm -rf cstore_fdw/ > git clone https://github.com/citusdata/cstore_fdw.git > cd cstore_fdw > make -j8 && \ sudo make install > sudo su - postgres > createdb sample; After the installation , in postgresql.conf specify shared_preload_libraries = 'cstore_fdw' > CREATE EXTENSION cstore_fdw; > CREATE SERVER cstore_server FOREIGN DATA WRAPPER cstore_fdw;

Automate failover in postgres replication using repmgr

repmgr.conf =========== failover=automatic pg_bindir='/usr/lib/postgresql/9.5/bin' promote_command='repmgr standby promote -f /etc/repmgr/repmgr.conf' follow_command='repmgr standby follow -f /etc/repmgr/repmgr.conf' note pg_bindir property otherwise you will pg_ctl unknown command error postgrsql.conf ============== shared_preload_libraries = 'repmgr_funcs' repmgrd helps to monitor the replication , with -d/--daemonize option you can run this as a deamon process Run the following command in standby server 1 & 2 alone , create a log file as postgres user otherwise you will get permission issue > sudo su - postgres > vi repmgr.log > repmgrd -f /etc/repmgr/repmgr.conf --verbose > repmgr.log 2>&1 repmgr=# select * from repmgr_cluster.repl_nodes order by id;  id |  type   | upstream_node_id | cluster | name  |                   conninfo                   |   slot_name   | priority | active ----+---------+--------