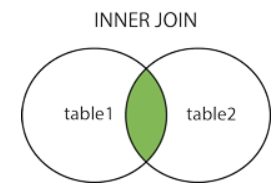
Joins are used to combine rows from two or more tables based on related columns between them. Joins allow you to retrieve data from multiple tables simultaneously, enabling you to create complex queries that fetch data from different sources. There are different types of joins in SQL, including: INNER JOIN Returns only the rows that have matching values in both tables based on the specified join condition. It discards non-matching rows from both tables. Example: create table t1(x int); insert into t1 values(1); insert into t1 values(1); insert into t1 values(0); create table t2(y int); insert into t2 values(0); insert into t2 values(1); insert into t2 values(1); select * from t1 inner join t2 on t1.x = t2.y Output: 2. LEFT JOIN (or) LEFT OUTER JOIN Returns all the rows from the left (or first) table and the matching rows from the rig...
Get link
Facebook
X
Pinterest
Email
Other Apps
MLFlow Serving Custom Models in production environment
Get link
Facebook
X
Pinterest
Email
Other Apps
-
Serve Word2vec pretrained model using pyfunc flavor through docker.
After completing development, if you want to serve your trained model, then it has to be either logged or saved via log_model()/save_model() function using one of the built-in flavors.
MLflow does support multiple built-in flavors such as sklearn, keras etc and the flavor type is saved in the MLmodel file. Below is the example to save the model using sklearn flavor.
mlflow.sklearn.log_model(sk_model, "sk_models")
Flavors are the key concepts which makes MLflow more powerful. Flavors are a convention that deployment tools can use to understand the model, which makes it possible to write tools that work with models from any ML library without having to integrate each tool with each library.
And the below command helps to expose the logged model as a service
Sometimes, you need to expose the model which is not supported by built-in flavor like the use case which we came across, this blog helps in addressing this problem. In those cases, python_function flavor helps to achieve this problem.
The python_function model flavor serves as a default model interface for MLflow Python models. Any MLflow Python model is expected to be loadable as a python_function model.
Here we consider google pretrained Word2vec model, used for NLP use-cases. By default, it doesn’t supported by MLflow built-in flavors, we are going to create a custom function for them.
mlflow.pyfunc
All the built-in flavors defines predict() function, we are going to achieve the same using the Python class which inherits from PythonModel, defining predict() and, optionally, load_context().
Here code_path helps to package necessary related code files and place it in code folder. In the same way model related files are saved in the artifact folder and it will be look like the below format.
log_model() folder structure
Once the custom models is created and saved in the ml tracking server, you can server them using the mlflow models server command.
Or you can package them using docker which will copy the required files in to the container and install the necessary packages which you have mentioned in the requirements and expose your model as server. MLFlow helps to achieve all the functions with one simple command which is given below
1) Out of the 11 words in selected_words , which one is most used in the reviews in the dataset? awesome love hate bad great 2) Out of the 11 words in selected_words , which one is least used in the reviews in the dataset? wow amazing terrible awful love 3) Out of the 11 words in selected_words , which one got the most positive weight in the selected_words_model ? (Tip: when printing the list of coefficients, make sure to use print_rows(rows=12) to print ALL coefficients.) amazing awesome love fantastic terrible 4) Out of the 11 words in selected_words , which one got the most negative weight in the selected_words_model ? (Tip: when printing the list of coefficients, make sure to use print_rows(rows=12) to print ALL coefficients.) horrible terrible awful hate love 5) Which of the following ranges contains the accuracy of the selected_words_model ...
1) Which of the following statements are true? (Check all that apply) a) Linear classifiers are never useful, because they cannot represent XOR. b) Linear classifiers are useful, because, with enough data, they can represent anything. c) Having good non-linear features can allow us to learn very accurate linear classifiers. d) none of the above 2) A simple linear classifier can represent which of the following functions? (Check all that apply) Hint: If you are stuck, see https://www.coursera.org/learn/ml-foundations/module/nqC1t/discussions/AAIUurrtEeWGphLhfbPAyQ a) x1 OR x2 OR NOT x3 b) x1 AND x2 AND NOT x3 c) x1 OR (x2 AND NOT x3) d) none of the above 3) Which of the the following neural networks can represent the following function? Select all that apply. (x1 AND x2) OR (NOT x1 AND NOT x2) Hint: If you are stuck, see https://www.coursera.org/learn/ml-foundations/module/nqC1t/discussions/AAIUurrtEeWGphLhfbPAyQ d 4) Which of the following statements is true? (Che...
1) What’s the least common category in the training data? a) bird b) dog c) cat d) automobile 2) Of the images below, which is the nearest ‘cat’ labeled image in the training data to the the first image in the test data (image_test[0:1])? f 3) Of the images below, which is the nearest ‘dog’ labeled image in the training data to the the first image in the test data (image_test[0:1])? d 4) For the first image in the test data, in what range is the mean distance between this image and its 5 nearest neighbors that were labeled ‘cat’ in the training data? a) 33 to 35 b) 35 to 37 c) 37 to 39 d) 39 to 41 e) Above 41 5) For the first image in the test data, in what range is the mean distance between this image and its 5 nearest neighbors that were labeled ‘dog’ in the training data? a) 33 to 35 b) 35 to 37 c) 37 to 39 d) 39 to 41 e) Above 41 6) On average, is the first image in the test data closer to its 5 nearest neighbors in the ‘cat’ data or in the ...

Comments
Post a Comment